


This is the second part of a five part article. The first part is HERE, although if you are going to use only the laser parts of the code you can start here. NOTE : PLEASE USE APPROPRIATE GOGGLES. USE LASER SAFETY GOGGLES RATED TO WHICH EVER COLOR AND POWER LEVEL YOU PURCHASE!!!
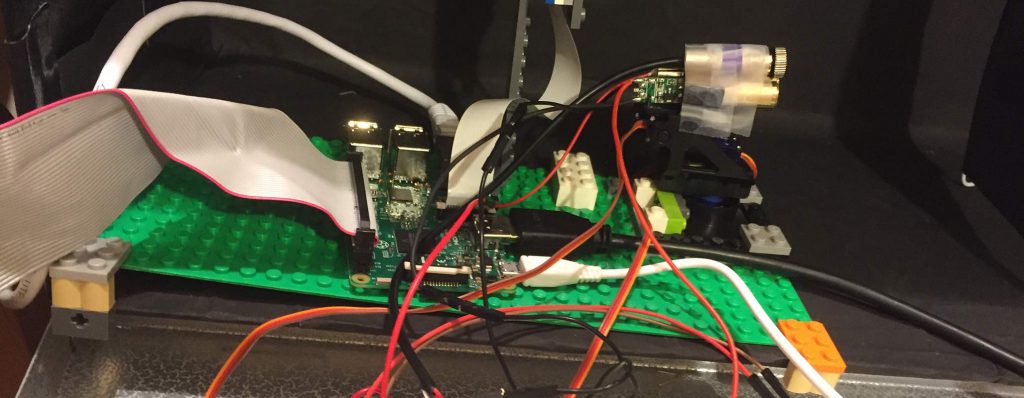
Take a look at the pictures and diagrams, I have added three lasers to the servo project. I have also included servo #1 – the tilt (up and down) servo to go along with the pan (side to side) servo in the last article.

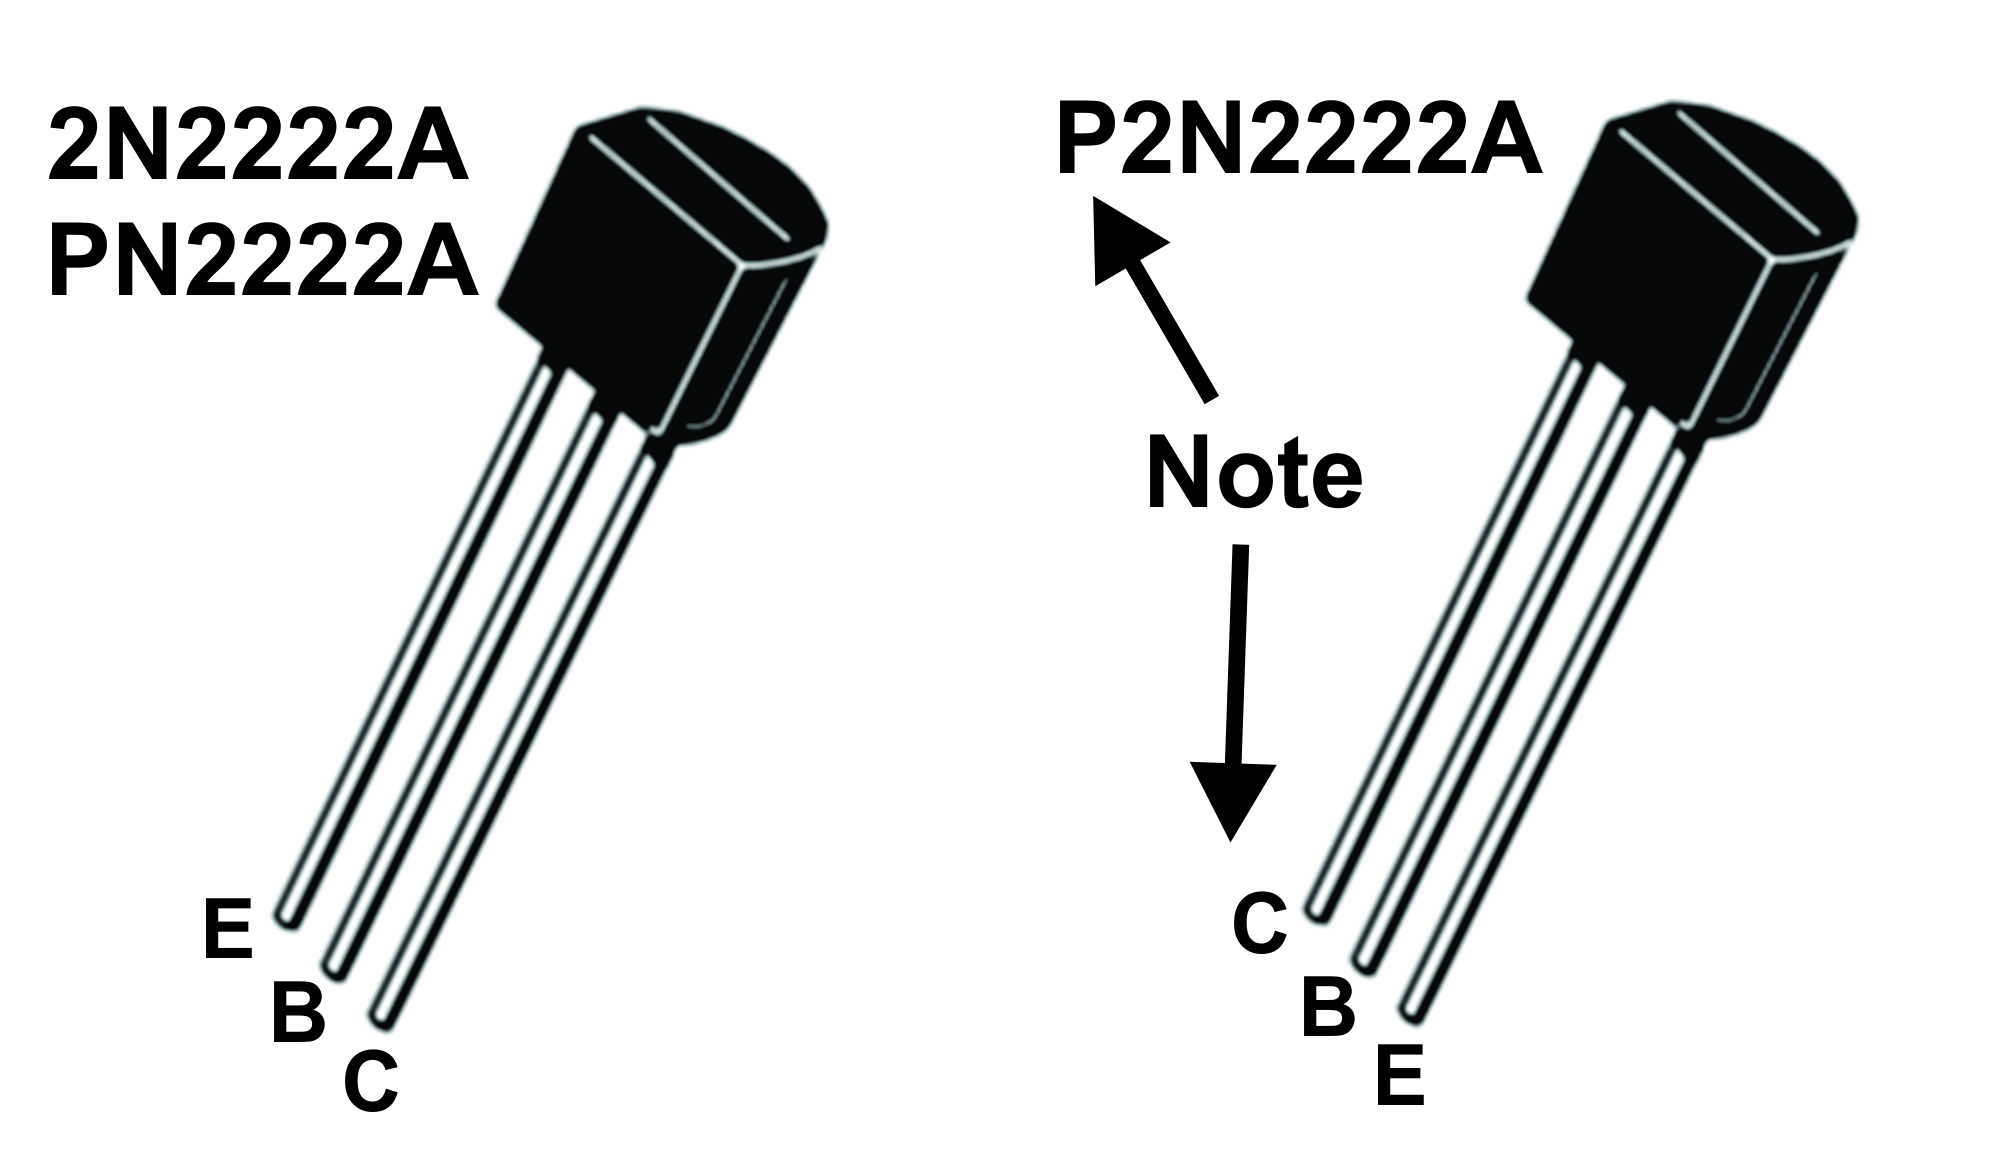
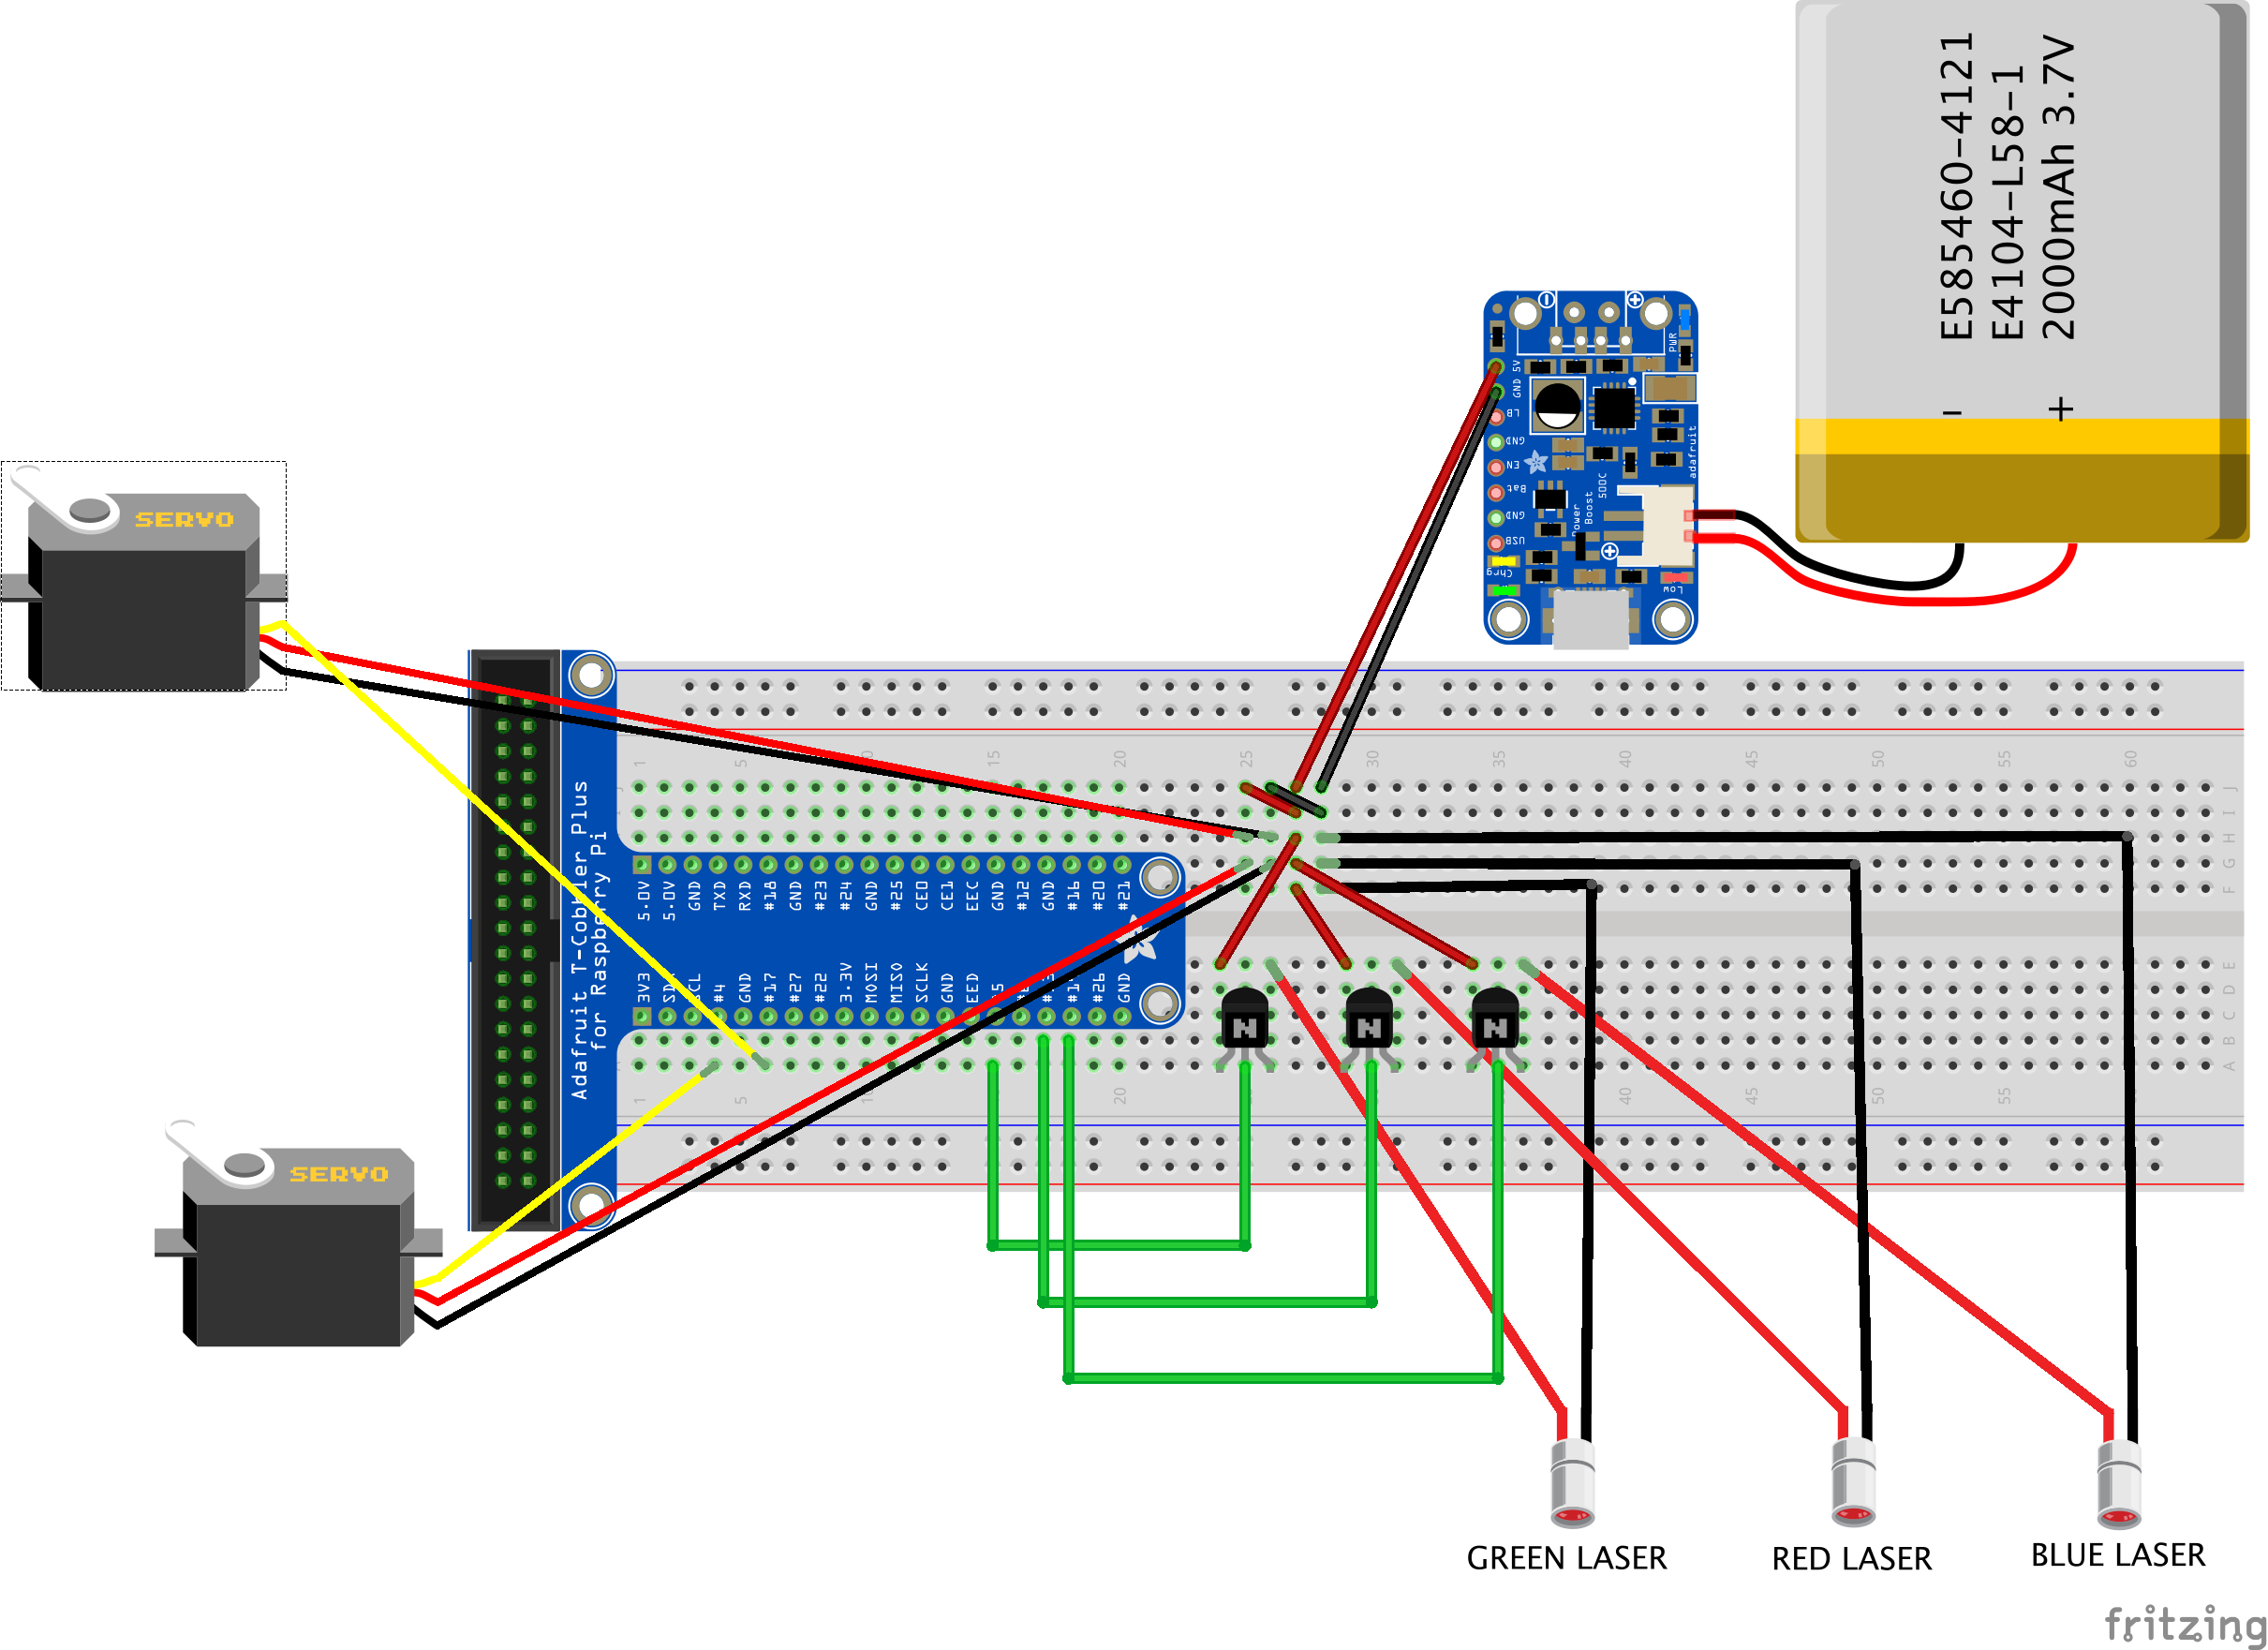
The lasers are controlled by a really common transistor called the 2n2222. When you turn power on to the “base” pin, it allows power to flow from the “collector” pin to the “emitter” pin. In short, it is an on and off switch. It’s a lot like the “alternator” in my old christmas lights mashup, but it’s a lot smaller and is controlled by the GPIO port on the raspberry pi that allows power to go from my battery to the laser. This causes the laser (maser?) to “fire”. It also gives the python code below control of firing that laser.
Just like in the last article, the pictures have a Micro Center battery, but the diagram has an Adafruit battery. This is because the diagraming software Fritzing has Adafruit models available. I ordered the lasers from well rated sellers on eBay. We used 200mW lasers for all three colors. They are really available, and there are a lot of sellers. Our shipper had a little problem in customs with the blue laser, Have fun, getting good lasers might be as difficult as all the wiring combined.
You might notice that there is also a lego post with a pi camera on it. This is a standard raspberry pi camera, 2mp from an old project. I was firing lasers, and did not want to risk destroying the few 8mp cameras I have. This camera is not in the wiring diagram above.
At this point I want to remind anyone reading : USE GOGGLES. READ GOGGLES NOTE AT TOP OF ARTICLE.
The code below could use a lot of improvements, try to remember it was made for a science project that changed many many times as we went along. If you improve on it, please let me know in the comments box below!
|
1 2 3 4 5 6 7 8 9 10 11 12 13 14 15 16 17 18 19 20 21 22 23 24 25 26 27 28 29 30 31 32 33 34 35 36 37 38 39 40 41 42 43 44 45 46 47 48 49 50 51 52 53 54 55 56 57 58 59 60 61 62 63 64 65 66 67 68 69 70 71 72 73 74 75 76 77 78 79 80 81 82 83 84 85 86 87 88 89 90 91 92 93 94 95 96 97 98 99 100 101 102 103 104 105 106 107 108 109 110 111 112 113 114 115 |
#!/usr/bin/python #import libraries import os import time import picamera import RPi.GPIO as GPIO #start camera camera = picamera.PiCamera() #get timestamp timeStamp = time.strftime("%Y%m%d_%H%M-%S",time.gmtime()) #set scalar variables for top tilt, bottom tilt, angle increment and Pan (side movement) topHat = 20 bottomHat = 11 angleHat = .05 sideHat = 31 #naming array of colors and their values - port on GPIO, name, and what color goggles colorHat = { "r" : { "port" : 29, "name" : "red", "goggles" : "blue"}, "b" : { "port" : 35, "name" : "blue", "goggles" : "red"}, "g" : { "port" : 33, "name" : "green", "goggles" : "red or blue"} } # Start the servo motors #startServod = "--step-size=40us --cycle-time=100000us " # not in use startServod = " " os.system('sudo /home/pi/PiBits/ServoBlaster/user/servod ' + startServod) # send camera output to video file in "discobunnies" directory camera.start_recording('discoBunnies/video_' + timeStamp + '.h264') time.sleep(2) #variable to start servo at bottom of tilt ai = bottomHat #move servos to starting position os.system("echo 1=" + str(sideHat) + "% > /dev/servoblaster") os.system("echo 0=" + str(bottomHat) + "% > /dev/servoblaster") time.sleep(0.5) #open LASER GPIO ports GPIO.setmode(GPIO.BOARD) for myPort in colorHat.keys() : # same as ["r","b","g"] GPIO.setup(colorHat[myPort]["port"], GPIO.OUT) GPIO.output(colorHat[myPort]["port"], False) #what colors can we use? (its an array) colorsAvail = ('r','g','b') #set test condition to fire laser laserFire=1 while laserFire: #ask user for color and gives advise color = raw_input('What Color? (r,g,b)') print "Ok firing " + colorHat[color]["name"] + "laser"; #ask user for seconds to fire and advise seconds = raw_input('How many seconds?') print "Okay the seconds to fire are: " + seconds # If questions are answered correctly, move on and warn before fire if (colorHat[color]["port"]) and ( 1 <= int(seconds) <= 300 ) : #show warning to user and wait for return key print "Okay I will fire the " + colorHat[color]["name"] + " laser for " + seconds + " seconds" raw_input("Press Return To Fire, please wear your " + colorHat[color]["goggles"] + " now...") #fire laser code try and except if program is interrupted try : GPIO.output(colorHat[color]["port"], True) time.sleep(int(seconds)) except : GPIO.output(colorHat[color]["port"], False) os.system('sudo killall servod') camera.stop_recording() #end laser fire loop laserFire = 0 #advise user laser has fired print "Firing complete, remove goggles." #stop firing just in case -- safety only GPIO.output(29, False) GPIO.output(35, False) GPIO.output(33, False) # move servos back to bottom - safety only os.system("echo 0=" + str(bottomHat) + "% > /dev/servoblaster") time.sleep(0.5) #stop camera camera.stop_recording() #stop servo control system os.system('sudo killall servod') |
PLEASE REMEMBER TO WEAR SAFETY GOGGLES AT ALL TIMES WHEN LASERS ARE IN USE. READ ABOVE. PLEASE.
Video : First Green Laser Test
Test firing lasers to see what we can cut :


Pingback: Tales of a 6th Grade Maker: Tribulations of a Laser Cutting Science Fair Project | Make: